New Zealand North Island 7 Day Itinerary
This New Zealand North Island 7 Day Itinerary has been a long time coming. During spring break of 2017, my (now) husband and I flew across the world to the North Island of New Zealand on our very first independently planned and paid for trip! The craziest part was that we were students! We saved tiny bits of our student sized income for 3 years for this trip and it was finally happening. To this day, it’s one of the best trips I’ve ever been on.
New Zealand is the perfect travel destination for everyone. Truly. There are mountains for hiking, geothermal spots for science lovers and spa-goers, expansive beaches, waterfalls, rolling hills, lakes, caves, incredible museums, and so much more! One week isn’t a ton of time for this rich country, so let’s get going!

When to Visit New Zealand
I’ve written about how off-season travel is one of the best times to visit many destinations for students (and travelers) on a budget! This comes pretty naturally with New Zealand because their seasons are the opposite of those here in the Northern Hemisphere. So, when we visited for our spring break, it was fall in New Zealand. We got cooler temperatures, less crowds, and cheaper accommodation.

I recommend visiting March-May and September-November for similar off-season benefits with mild climate. The warmest months are January and February with temperatures from 68°F to 90°F, and the coldest month is typically July where average temperatures are in the 40’s and 50’s. The most rain occurs from June to August (winter).

How Much a One Week Trip to New Zealand Costs
I’m a big advocate for using Microsoft Excel to plan trip budgets and our trip to New Zealand no different. I had a running spreadsheet to keep track of all the expenses including activities we wanted to do, flights, accommodation, food, transportation, and everything else! If you follow this itinerary, this is an approximate price breakdown. Grab a free Excel vacation budget planner here!
- $160 rental car + GPS
- $100 gas
- $800 flight + insurance
- $250 lodging
- $55 Hobbiton
- $50 Waitomo Glowworm Caves
- $150 additional activities (Aquarium, Wai-O-Tapu, etc.)
- $150 food
- + $85 buffer
*Note: if you split food, gas, lodging, and rental car costs, the total cost decreases. This is just a baseline for all the necessities and activities in this itinerary. Your flight price may vary (we flew from Los Angeles to Auckland).
[convertkit form=2361572]
Tips for Saving Money in New Zealand
1. Use Your Student ID
New Zealand is very student friendly and has student discounts at so many places! Don’t forget your student ID because I guarantee it can save you money.
As an example, your student ID can save you $6.50 for entry at Sky Tower in Auckland.
2. Be Flexible
Despite being a hyper-planner, going into this trip we didn’t have detailed plans for every day. It might be because I was too busy with school or because we wanted the freedom to change our plans. However, we ended up visiting some great attractions that I wouldn’t have known about sooner because of brochures and local’s tips. The added bonus was that many local brochures had coupons for entry to various attractions. One example was Kelly Tarlton’s Sea Life Aquarium in Auckland where general admission tickets cost $22, but student tickets are $17 and with a coupon for a couple $ off, it’s even lower!

3. Look for Groupon Deals
I love Groupon! Deals on deals on deals. My favorite travel tip is to log into Groupon once you’re in a new country, set your location appropriately, and search for deals. I personally like to use Groupon for restaurant vouchers when abroad. Of course, check the restaurant’s reviews and menus to be sure you’ll like it, but saving money with Groupon on meals is awesome!
We used a Groupon to try a fantastic Indian restaurant in Auckland where we got a meal for 2 with appetizers, entrees, and a dessert for only $15!
4. Book Big Tours Ahead of Time
I know I just said to be flexible, but you can’t do that with big tours. Especially depending on when you travel, tours do fill up. These include the Hobbiton tour and that for the Waitomo Glowworm Caves. Plus by booking ahead of time, you can scout out the best prices and jump on any deals, early ticket discounts, or combo tickets that you wouldn’t see the day of!
5. Remember the Exchange Rate
It can get a little confusing when researching costs in New Zealand because the currency there is the New Zealand Dollar. The symbol is the same as US Dollars. So, tours, meals, and other costs might look really expensive, when in reality they aren’t as pricey as you think. At the time of writing this, 1 NZD = 0.66 USD. A $20 NZD meal, only costs $13 USD! For the purpose of this blog post all dollar amounts are in USD!

Transportation: Self-Drive New Zealand
It is an option to take public transportation (mainly buses) across New Zealand’s North Island. However, I highly recommend renting a car. It will save you so much time to self-drive this route and itinerary. And when you only have 7 days in New Zealand, you need all the time you can get. We rented with JUCY and spent $225 for a week, but we were under 25 years old so we had to pay extra. At the time of writing, you can rent a hybrid car for only $74 for a week!
Note that if you are under 25 years old, rentals will cost more.

One thing you absolutely will need is a GPS. Don’t rely on printed out Google Maps or your phone. Driving around New Zealand, the service can be dodgy for your phone, so a GPS is so much easier! You can rent them from the rental car companies.
Other things to keep in mind: You’ll be driving on the opposite side of the road! Don’t panic but be aware of your surroundings and if you can have a passenger navigate, that will help the driver focus on the rules of the road. You do get the hang of it, but it takes constant thought (and don’t be embarrassed when you hit the wipers when you’re trying to hit your turn signal, the levers are reversed too). The last thing to remember is that gas prices are very expensive in New Zealand, where it can cost >$2.30 for a liter, which is only 0.26 gallons! Be prepared to spend a good chunk of change on fuel.
If you like, you can also look into campervans for your New Zealand road trip. However, we didn’t stay in one so I don’t feel like I can speak on them.

Flights to New Zealand’s North Island
For this itinerary, you’ll be starting in Auckland and ending in Auckland…so fly into Auckland. Part of the reason we chose the North Island versus the South Island was because flights into Auckland were by far the cheapest for us from Los Angeles. Other cities like Wellington, Christchurch, or Queenstown were just too expensive.
Where to Stay on New Zealand’s North Island
When we visited, we stayed in the most budget-friendly Airbnb’s we could find that were comfortable. Unfortunately, since this was in 2017, the Airbnb’s we stayed in are no longer available.
Since they are no longer available (boo), here are some other options of where to stay. This itinerary will be 3 nights in Auckland, 1 night in Hamilton, and 2 nights in Rotorua.
Typical costs for stays are around $50/night for the entire place, and as low as $16/night for a private room! Accommodation is pretty inexpensive in New Zealand… another reason why it’s a great student travel destination!

Before You Leave
As this is likely an international trip for you, be sure to read my top 10 things to do before traveling internationally! These are SUPER important, like getting some local currency, finding travel insurance, and what documents you need.
North Island 7 Day Itinerary Map
Day 1: Arrival at Auckland
Welcome to New Zealand! Or Haere mai (high-reh-my) in Te Reo, the Maori language.
Spend your first day getting acquainted with Auckland, the new time zone (and season), and getting settled. Pick up your rental car and GPS, and get checked in to your hotel or Airbnb.
Take a second to unwind and relax if needed, but this first day is key to combatting your jet lag so don’t sleep if you can help it. Our first day, we drove around Auckland to get used to driving on the other side of the road, picked up a pizza, and got our ducks in a row for the next day.
If you have more time to spend on your first day and are feeling up for it, check out the Sky Tower in the city center for beautiful views of Auckland and the surrounding area from over 1000 feet in the air! Tickets cost $32 for adults and $23 for students.

Day 2: Exploring Auckland
Kelly Tarlton’s Sea Life Aquarium & Lunch
For your first real day in New Zealand, you’ll be exploring Auckland! There is so much to do in Auckland, so there are lots of choices. Personally, we visited Kelly Tarlton’s Sea Life Aquarium, which was a lot of fun! While it’s more geared more towards families, we still had a great time as a couple admiring the sea life and learning about New Zealand’s wildlife. Tickets cost $17 for students or $22 for adults. Not the cheapest thing to do, but for only one day in Auckland, it’s your choice.
After, grab some lunch at one of the many restaurants down the corner along Tamaki Drive. We chose Tonnino Pizzeria and it was delicious! Try the gnocchi, risotto, or what we had – the spaghetti Bolognese. Sometimes you just need a comfort meal while traveling (plus it was pouring rain on us that day). Entrees cost $13 each, so for even cheaper options, try E-Sarn Wok, a thai restaurant with entrees as low as $5.50, or Jewel of India with shareable options costing $16 total.

Auckland Botanic Gardens & Dinner
For the second half of the day, visit the beautiful (and free!) Auckland Botanic Gardens. Located 15 miles south of the city center, you’ll love this oasis sprawling with unique, beautiful flora.

There are over 20 unique gardens, which include perennials, Harakeke (flax important in the Maori culture), native plants, an orchard, herbs, roses, rocks, and our favorite, the Native Forest, a naturally kept area with wild nikau palms, fern groves, native birds, and flowing streams. The Native Forest was so peaceful and SO green!

Wrap up the day with some dinner and relax. Tomorrow it’s time for a hike!
Day 3: Kitekite Falls and Piha Black Sand Beach
Kitekite Falls
You can’t go to New Zealand without taking in the natural beauty and wonders around you. Even though we were told by many locals that the North Island was the uglier of the two (HA!), we were still in awe by every little thing. Kitekite Falls was no exception. After a 45 minute drive from Auckland, you’ll find this epic 3-tiered waterfall that you can access via a pretty easy 1.1 mile trail. (I’m not a great hiker and don’t usually actively seek out difficult trails, so if I can do it, so can you!).
The directions to Kitekite Falls can be a little difficult for GPS systems. We soon discovered that our GPS liked to just lose service in the middle of our trips. We named our GPS Paul, so if we were late or got lost we could always blame it on Paul. Anyway, this first happened when we tried to get to Kitekite Falls.

Here’s how to get to Kitekite Falls: From Auckland, you’ll end up on Piha Road, which after a sharp left curve turns into Seaview Rd (it’s not a full turn, the road just curves around and the name changes). After 1 km past this point, turn right on Glenesk Rd (which looks more like a fork in the road than a 90 degree turn) and continue straight until it dead-ends into the parking lot for Kitekite Falls.
As you enter the trail, you’ll see a station to clean your shoes to protect the trail. Please use the station. We thought this was the coolest thing! What a concept! Caring for your environment and wildlife so much so that you have visitors clean their shoes.
After your hike and waterfall “ooh-and-ahh-ing”, grab some lunch in town at Murray Piha, where they serve tacos, ceviche, and quesadillas. Meals will cost about $10 per person. For a budget-friendly option, head to Piha Store and grab some prepared sandwiches or stuff to make your own ocean-side picnic. You’re headed to the beach next!

Piha Black Sand Beach
For a relaxing second half of the day, settle in at Piha Beach, one of New Zealand’s black sand beaches. There are lots of fun things to do in Piha, but one popular one is take surfing lessons from Piha Surf School. Of course, if you plan to go in the water, make sure you bring your bathing suit, towels (this microfiber one is my favorite compact travel towel), sunscreen, and a hat!
The day we visited it was a little chilly for swimming so we just laid out on the beach, took some photos, people-watched, and relaxed for a bit. It was the perfect cap on the hike from earlier.

Day 4: Hobbiton (+ Auckland to Hamilton)
Hobbiton
Today’s the day we’ve all been waiting for! I’d be lying if I said Hobbiton wasn’t one of the sole reasons we chose to travel to New Zealand. We are huge Lord of the Rings fans. We watch the movies religiously and quote it regularly. I even study to the soundtracks or listen to themed ambiances (one of my favorite ways to feel like I’m traveling from home). Needless to say Hobbiton is a must-do in New Zealand. Even if you aren’t a big fan, Hobbiton is so beautiful and peaceful. Plus I guarantee you’ll learn something neat about the franchise on the guided tours. If nothing else, you can try Hobbiton exclusive beer at the Green Dragon Inn!

So, wave goodbye to Auckland, we’re headed out! To get to Hobbiton head south mainly via State Hwy 1. The drive takes 2 hours and 15 minutes. I recommend driving directly there, as opposed to booking a tour that departs from Auckland or elsewhere. It’s more expensive that way, plus you already have the car and will be driving south anyway for the rest of the North Island stops. I recommend the direct tour from Shire’s Rest! There are only guided tours, which cost ~$60 per person so you’ll need to book something ahead of time. Once you’re there, check in and soak it all in!
Related read >> Everything to know about visiting Hobbiton
To finish out the day, drive an hour to Hamilton where you’ll be staying the night. Relax, unwind, and grab some dinner. If you’re looking for more things to do in Hamilton, you can visit the Hamilton Gardens. I’m kind of bummed we missed this, to be honest! It looks like an incredible attraction with Indian, Italian, Japanese, Chinese, and English gardens, plus a variety of ecosystems. Considering this is a free attraction, it’s a perfect option to add to your itinerary.
Day 5: Waitomo Glowworm Caves, Otorohanga Kiwi House, Thermal Spa (+ Hamilton to Rotorua)
Waitomo Glowworm Caves
Truly one of New Zealand’s bucket list experiences, this natural wonder really has to be seen to be believed. The Waitomo Glowworm Caves are an extensive network of caves that are home to a species of gnat, that in their larval stage are bioluminescent! A true science site!

Starting in Hamilton, drive South for one hour via State Hwy 39 to the Glowworm Caves. You’ll need to check-in with your tour and you’re off. There are a variety of tours that explore different caves in the system, but all tours typically visit the glowworm caves and have a boat ride! We personally did a twin cave experience, where we visited Aranui Cave and the Waitomo Glowworm Caves, for $56 each. The Glowworm Caves were incredible, but since I had been to other caves before, the Aranui Cave (which did not have glowworms) wasn’t as much of interest to me.
If I could go back, I would trade that tour for a longer one that exclusively visits caves with glowworms like this incredible 3 hour tour!
Otorohanga Kiwi House
Start the drive to Rotorua where you’ll be spending the final two nights. Otorohanga Kiwi House and Native Bird Park is a fun stop along the way! Entry is $17 per person, which helps fund their important conservation work for New Zealand’s endangered animals. Here you can see and learn about various kiwi birds, blue duck, falcon, Kakariki, parakeet, oystercatcher, and more! Plus, they have unique reptiles including tuatara that have been around for 225 million years!

We made this stop because it popped up on our GPS. It wasn’t crowded at all. We really enjoyed learning more about New Zealand’s wildlife! It was really cool to actually see kiwi birds, since they are nocturnal (they have a special dark room habitat for them).

Thermal Spa
Once you arrive in Rotorua, get settled, grab dinner, and if you feel up for it, head to a thermal spa. This was one thing we really wanted to do in the area. We had seen brochures since the minute we landed in Auckland and wanted to splurge a little on it. We ended up visiting Hell’s Gate late in the evening for some night spa time. We took a mud bath, relaxed in hot springs, and stargazed a bit. It was really peaceful and a perfect way to end the day.

Entry to the spa including the mud bath costs $53 per person. However, you can nix the mud bath and enjoy the Sulphur spas for only $17 per person. My top recommendations are to rent a bathing suit and towel for $3.30 per item, wear clothes you don’t care about, and bring a Ziploc or sealable bag on your trip to seal the clothes your wore to the spa. They are going to smell like sulfur for A LONG TIME. That is a promise. Using their bathing suits and towels are one less worry when it comes to the lingering sulfur smell.
Don’t let that deter you! Hell’s Gate was one of our favorite parts of our trip….just wash those clothes separately for a while once you get home.

Day 6: Explore Rotorua (Wai-O-Tapu and Taupo)
Welcome to Rotorua, the hub of geothermal activity and Maori culture on the North Island. You can really spend more than one full day here, especially since there are so many great family-friendly activities in Rotorua, but one day is what we’re working with so that’s okay.
Wai-O-Tapu Thermal Wonderland
There are a couple big attractions you’ll want to see, but our favorite that we prioritized was Wai-O-Tapu Thermal Wonderland only 25 minutes from Rotorua.
Here, you can see the geothermal wonders come to life! Watch the Lady Knox geyser erupt, admire the colorful Champagne Pool, and soak in the Sulphur smell because there is no lack of gasses here. You’ll be stunned at how vibrant the colors are!

Admission is $22 per person and includes the Geothermal Park and Lady Knox Geyser. We spent 2 hours here and felt like we saw everything.

Afternoon Activities – Option 1
For the afternoon, there are a number of options since this area has so much to do! You can visit Te Puia, a Maori museum, spend the day at a spa if you didn’t already go last night, hike Mount Tarawera, discover the buried village of Te Wairoa, or take a walk through the treetops!
Afternoon Activities – Option 2 (Taupo)
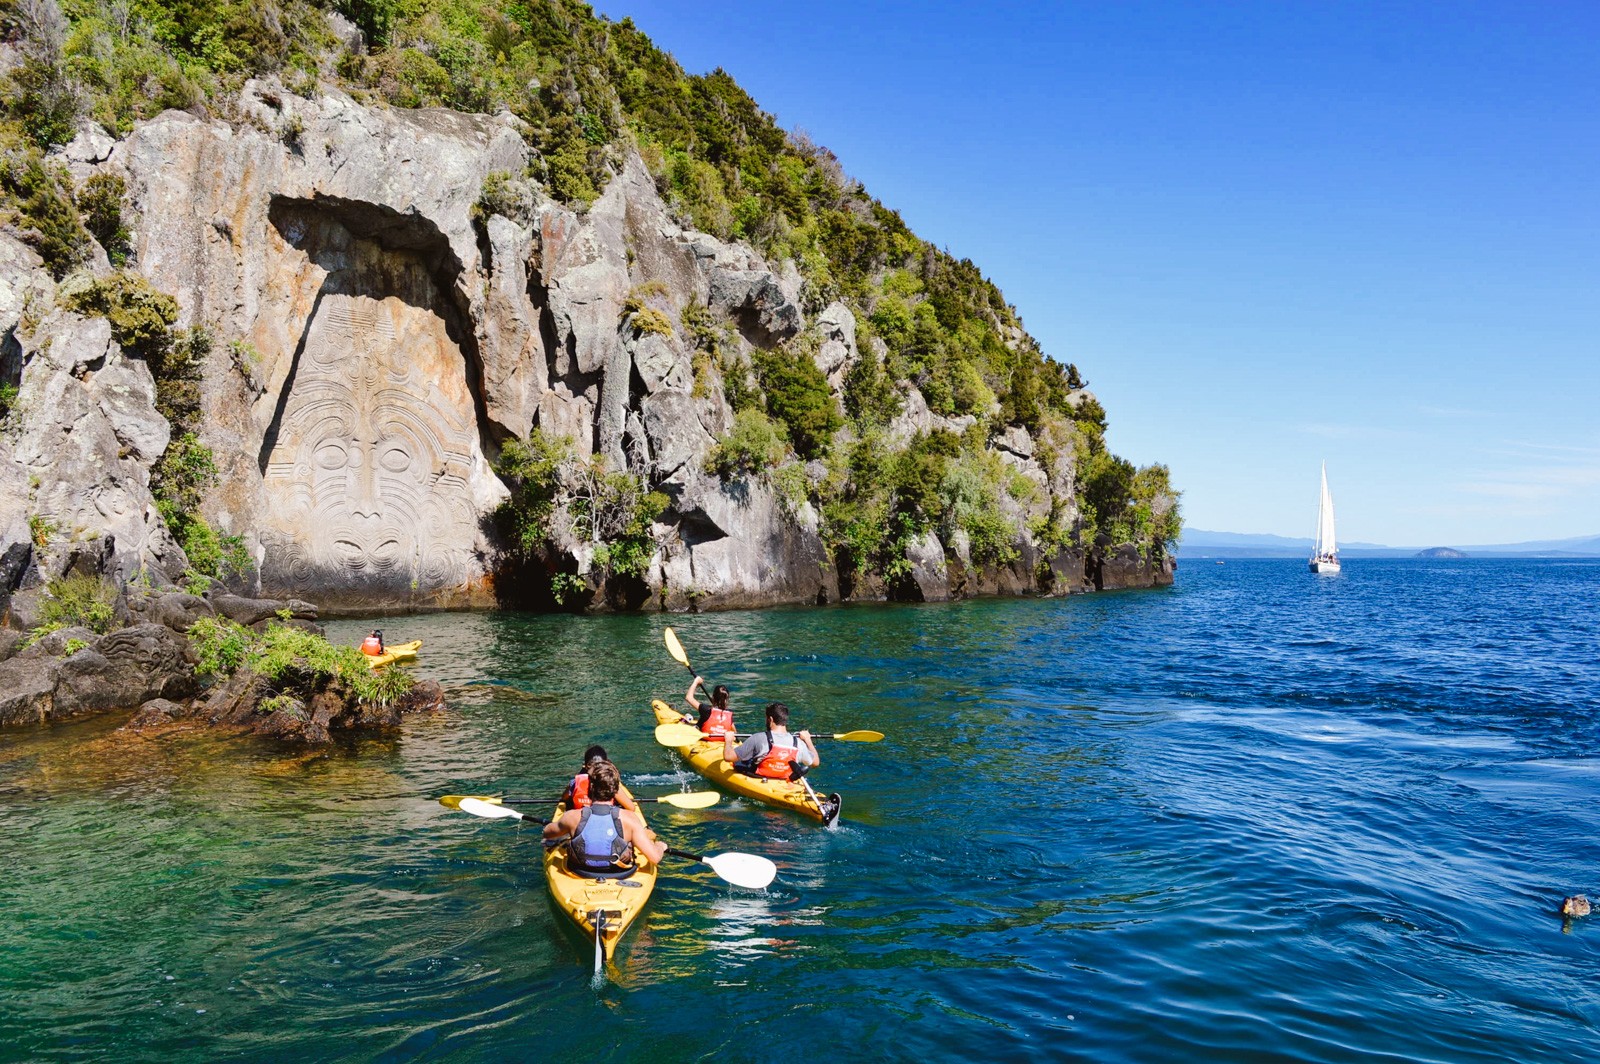
However, given all those activities, we were pretty tired at this point in the trip so we decided to take a scenic cruise on Lake Taupō to see Maori rock carvings and learn about the area. It was the perfect relaxing activity to sit back on a boat, listen to some stories, and admire the clear water and gorgeous views! I highly recommend this tour to close out your trip.
Meals today are up to you, depending on your activities. You can easily grab food at Wai-O-Tapu, stop in town, or grab something before your Lake Taupō cruise.

Day 7: Rotorua to Auckland
For your final day, get packed and head back to the Auckland airport to get ready for your flight home. If you have a late flight, feel free to add a morning activity, like one of the things you may not have had time for in Rotorua or something easy back in Auckland.
Or you can just head back to the airport soaking it all in and taking some final mental pictures of New Zealand…or make one quick stop to grab a freakshake (crazy shake) at 10am in Auckland because you really wanted one at the frontend of the trip but everywhere was closed because it was a weekday. That’s fine too, and totally normal. You’d be in good company!

Check out these other helpful posts:

My Travel Essentials
- Travel Insurance – Going on an international trip? Don’t forget travel and medical insurance with SafetyWing.
- Travel Card – If you’re new to travel hacking, fear not! My favorite card for beginners gives you $750 in rewards when you spend $4,000 in the first 3 months, plus lounge access, 10x points on hotel bookings, and free TSA pre-check!
- Get Your Guide – Check out Get Your Guide for a one-stop-shop for booking travel activities.
- Booking.com – This is my favorite hotel search aggregator, specifically for reading reviews. On Booking.com, the reviews can be searched for keywords like WiFi, breakfast, pool, amenities, etc.! So helpful!
- Anti-pickpocket bag – Worried about having your valuables swiped? PacSafe makes the best travel bags with zippers and straps that lock and with mesh steel enforced fabric.
- Give the Gift of Travel – This is the perfect gift for travelers in your life! Tinggly allows you to gift experiences around the world, perfect for birthdays, weddings, or anniversaries.
- Staycation Idea – Check out Resort Pass, which gives you day passes to resorts so you can use their pool, spa, and fitness center, a great staycation idea!
Save to Pinterest




Fab post! I would love to go back to NZ to explore in the autumn. We visited in the summertime and I LOVED it. We did visit most of these places, but I really want to visit Waitomo Glowworm Caves. I loooved Wai-O-Tapu as well as the amazing mountains in Tongariro National Park. If ou go back, I have a feeling you’d really enjoy hiking at Tongariro!
We loved autumn there. The weather was perfect! I agree…I think Tongariro National Park would be near the top of the revisit itinerary!
I’ve been to New Zealand a few times and just love it. I did the glowworms float through the cave and it was otherworldly I’d love to see that Maori carving by kayak. Great post I’m saving for future trips.
I totally agree about the otherworldliness of the glowworms! I remember our boat just falling silent.
I love how thorough this guide is! I spent the same amount of time in north island doing the same things! ABSOLUTELY loved it! 🙂 It’s definitely a place I can’t wait to visit again!
Same Kylie! The second we left, I was ready to visit again!
This is an awesome post! The glowworm cave looks incredible… what an experience! I’d love to see something like that – I’ve also heard of places where there is bioluminescence in the algae so waves glow when they hit the shore. Too cool. Great post, thanks for sharing!
Ohh I’m dying to see the bioluminescent ocean! It just happened in Los Angeles over summer (where I’m from), but I’m currently in Georgia, so I missed it! Might need to go to Florida instead to see it!
Woww! This is such a comprehensive and helpful guide. New Zealand has been on my bucket lust for as long as I can remember! This post just increased my travel itch. The thermal spa sounds like a refreshing thing to indulge in and that freakshake looks amazingly tempting – Glad you stopped for it! Saving this right in my helpful guides bookmarks for the future!
I’m so glad you found it helpful! The thermal spa was perfect, especially at night under the stars.
I loved reading your post about New Zealand! It looks like you had the most amazing time! I lived on the North Island for a year and travelled the country almost top to bottom. It is my absolute favorite place in the world and I can’t wait to someday move back there for good 🙂
I could totally see myself living there as well! It’s such a perfect destination!